Whether you're a student, a professional, or just someone trying to get through a busy day, accidental touchscreen taps on your Chromebook can be incredibly frustrating. They interrupt your flow, send your cursor flying, or even close that crucial tab you were just working on. If you're looking for quick ways to temporarily turn off touchscreen on Chromebook, you've come to the right place. This guide will walk you through the most effective and reliable methods to regain control of your digital workspace, ensuring your screen only responds when you want it to.
Here's a quick look at how you can take charge:
At a Glance: Temporarily Disabling Your Chromebook Touchscreen
- Best for Quick Toggles: Enable "Debugging keyboard shortcuts" in
chrome://flags, then useSearch + Shift + T. - Best for Stability: Check your Chromebook's native
SettingsunderDevicefor a "Touchscreen" toggle (if available). - For Advanced Users Only: Use terminal commands after enabling Developer Mode (be warned: this wipes your device!).
- Non-Technical: Consider physical overlays as a temporary, non-software solution.
- Why Disable? Prevent accidental inputs, improve focus, keep your screen clean, and troubleshoot phantom touches.
Why You Might Want to Temporarily Silence Your Touchscreen
The touchscreen on a Chromebook is often a fantastic feature, offering intuitive navigation and interaction. However, there are plenty of situations where it can become more of a hindrance than a help. Understanding these reasons can help you decide which disabling method best suits your needs:
- Prevent Accidental Input: This is perhaps the most common reason. When you're typing intensely, your palm might brush the screen, registering unintended clicks or moving your cursor away from your text. Disabling the touchscreen eliminates these disruptive "phantom touches."
- Improve Focus and Reduce Distractions: For many, a constantly responsive screen can be a subtle distraction. Knowing that your screen won't react to an inadvertent brush allows you to concentrate purely on your keyboard and trackpad inputs.
- Maintain Screen Cleanliness: Every touch leaves a fingerprint or smudge. Temporarily turning off the touchscreen can help keep your display pristine, especially when you're working in environments where frequent cleaning isn't practical.
- Troubleshooting Erratic Behavior: If your touchscreen is acting up – registering touches that aren't there, or failing to respond correctly – disabling it can help you diagnose if the issue is software-related or a deeper hardware problem. It's an excellent first step before seeking repairs.
- Educational Use Cases: In educational settings, disabling touchscreens can be crucial. It helps prevent young children from accidentally interacting with the screen, ensures consistent input for standardized testing, or simply keeps students focused on keyboard-based tasks.
- Marginal Battery Life Extension: While not a primary reason, reducing the activity of the touch sensors and their associated processing can contribute to a very slight extension of your Chromebook's battery life.
Whatever your motivation, knowing how to temporarily disable your touchscreen gives you more control over your device and your workflow.
The Quickest & Safest Methods to Disable Your Touchscreen
For most users, the goal is a simple, reversible solution that doesn't involve complex system changes. These two methods fit the bill perfectly.
Method 1: Chrome Flags & a Handy Shortcut (Recommended for Most)
This approach utilizes a Chrome Flag, which is essentially an experimental feature built into Chrome OS. Once enabled, it provides a convenient keyboard shortcut to toggle your touchscreen on and off. It's the go-to for quick, temporary control.
What Are Chrome Flags?
Chrome Flags are experimental features that Google is testing for future versions of Chrome OS. They aren't fully polished and might change or disappear with updates, but they often offer useful functionality not yet available in stable settings. Think of them as a sneak peek or a power-user tweak.
Enabling the Toggle Shortcut
To get started, you'll first need to activate the debugging keyboard shortcuts flag:
- Open Chrome Browser: Launch Google Chrome on your Chromebook.
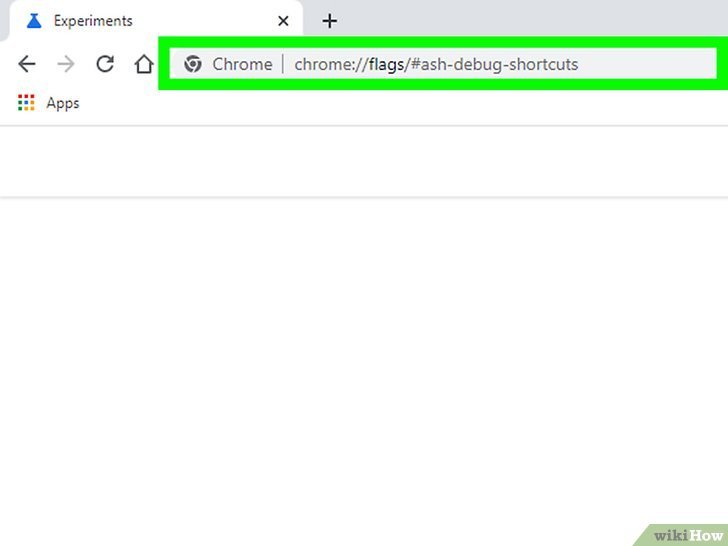
- Navigate to Flags: Type
chrome://flagsinto the address bar and press Enter. Alternatively, you can go directly to the specific flag by typingchrome://flags/#ash-debug-shortcuts. - Search for the Flag: In the search bar at the top of the Flags page, type "debugging keyboard shortcuts."
- Enable the Flag: Locate the "Debugging keyboard shortcuts" flag (
#ash-debug-shortcuts). Click the dropdown menu next to it and change its setting from "Default" to "Enabled." - Restart Your Chromebook: You'll see a prompt at the bottom of the screen to "Restart." Click it to apply the changes. Your Chromebook will reboot.
Using the Search + Shift + T Shortcut
Once your Chromebook restarts, the magic happens with a simple key combination:
- To Disable: Press
Search + Shift + Tsimultaneously.
- Quick Tip: The
Searchkey is typically located where the Caps Lock key would be on a traditional keyboard, often depicted with a magnifying glass icon. On external keyboards, this usually corresponds to theWindows Key.
- Confirmation: You'll see a brief notification on your screen confirming that the touchscreen has been "disabled."
- To Re-enable: Press
Search + Shift + Tagain, and you'll see a notification confirming the touchscreen is "enabled" once more.
This shortcut makes it incredibly easy to switch your touchscreen functionality on or off as needed throughout your day.
Important Considerations with Chrome Flags
While powerful, it's crucial to remember that Chrome Flags come with a few caveats:
- Experimental Nature: Flags are not stable features. They may contain bugs, impact performance, or be removed or changed in future Chrome OS updates without notice.
- Potential for Reset: System updates can sometimes reset flag settings to "Default." If your shortcut stops working, revisit
chrome://flagsto confirm the "Debugging keyboard shortcuts" flag is still enabled. - Managed Devices: If you're using a Chromebook provided by a school or workplace, your administrator might have restricted access to
chrome://flags, meaning this method may not be available to you.
Method 2: Native Settings (Check Your Chromebook First!)
Some Chromebook models, particularly newer ones or those designed with specific functionalities in mind, include a built-in toggle within the Chrome OS settings. If your device has this, it's generally the most stable and preferred method.
How to Look for the Native Toggle
It only takes a moment to check if your Chromebook offers this convenient option:
- Open Quick Settings: Click on the time/date area in the bottom-right corner of your screen. This will open the Quick Settings panel.
- Access Full Settings: Click the gear/cog icon (⚙️) within the Quick Settings panel. This opens the main Chrome OS Settings window.
- Navigate to Device Settings: In the left-hand sidebar of the Settings window, look for and click on the "Device" section.
- Search for Touchscreen Options: Within the "Device" section, explore subsections like "Display," "Touchpad and stylus," or "Input devices." Look for a direct "Touchscreen" toggle or any setting related to touchscreen input.
Why This is the Best Option (If Available)
If you find a native "Touchscreen" toggle in your settings, congratulations! This is the most stable, officially supported, and user-friendly way to control your touchscreen. Unlike Chrome Flags, these settings are part of the stable Chrome OS build, meaning they are less likely to disappear or cause unexpected issues with system updates. It's the ideal choice for reliable, consistent control.
For the Advanced User: Terminal Commands (Developer Mode Required)
For those who need comprehensive control or whose devices don't support the simpler methods, using terminal commands offers a powerful solution. However, this method comes with a significant prerequisite: enabling Developer Mode, which involves a full device wipe. This isn't for the faint of heart or those with sensitive local data.
A Critical Warning About Developer Mode
Before you even consider this route, understand that enabling Developer Mode will perform a Powerwash (a factory reset) on your Chromebook. This means:
- All local data will be erased. This includes downloaded files, stored settings, local Linux environments, and anything not synced to Google Drive.
- It requires a backup strategy. You MUST back up all important data to Google Drive, an external hard drive, or another cloud service before proceeding.
- Managed Devices: If your Chromebook is managed by a school or workplace, you likely won't be able to enable Developer Mode, or doing so could violate policy.
- Security Implications: Developer Mode also disables some of Chrome OS's built-in security features, making your device potentially more vulnerable.
Proceed with extreme caution and only if you fully understand and accept these risks.
Enabling Developer Mode
If you're still determined, here's how to enable Developer Mode:
- Backup Everything: Seriously, back up every piece of important local data.
- Power Up: Connect your Chromebook to a power source.
- Enter Recovery Mode: While the Chromebook is on, hold down
Esc+Refresh(the circular arrow key above 3 and 4) and then press thePowerbutton. Release all keys once the recovery screen appears. - Initiate Developer Mode: At the recovery screen (which usually says "Chrome OS is missing or damaged"), press
Ctrl + D. - Confirm Powerwash: You'll be prompted to "Turn OS verification OFF." Press
Enterto confirm. This action will erase all local data. - Wait for Preparation: Your Chromebook will now restart and begin preparing Developer Mode. This process can take 15-20 minutes. Do not interrupt it.
- Initial Setup: Once complete, your Chromebook will restart again, and you'll go through the initial setup process as if it were a new device.
Disabling Touchscreen via Command Line
Once in Developer Mode and set up, you can use the Crosh terminal:
- Open Crosh Terminal: Press
Ctrl + Alt + Ton your keyboard. This opens the Crosh terminal tab in your Chrome browser. - Access the Shell: Type
shelland pressEnter. This gives you access to the underlying Linux shell. - List Input Devices: Type
xinput listand pressEnter. This command will display a list of all detected input devices, along with their unique ID numbers. - Identify Touchscreen Device: Carefully examine the list. Look for entries that clearly indicate a touchscreen, such as "ELAN Touchscreen," "Atmel MaXTouch," or "touchscreen." Note down the corresponding
id=number for your touchscreen. - Disable the Touchscreen: Once you have the ID, type the following command, replacing
[ID]with the actual number you found:xinput disable [ID]
For example, if your touchscreen ID is 12, you would typexinput disable 12. - Verify Disablement: You can run
xinput listagain. The touchscreen device should now be listed as "disabled."
Re-enabling with Commands
To re-enable your touchscreen using the terminal:
- Re-open the Crosh terminal (
Ctrl + Alt + T), then typeshelland pressEnter. - Type
xinput enable [ID](using the same ID number you noted earlier).
Understanding the Temporary Nature
It's important to note that changes made via xinput commands in Developer Mode are often temporary. They will typically reset after a restart of your Chromebook. For permanent changes, much more advanced Linux configuration is required, which is beyond the scope of a temporary disable guide and generally not recommended for most users.
Non-Technical Workarounds: The Physical Approach
Sometimes, the simplest solutions are the most effective, especially if you're uncomfortable with software tweaks or if your device is managed. These physical methods don't disable the touchscreen electronically but rather prevent interaction.
- Thick Non-Conductive Screen Protector: Applying a screen protector that's thick enough and made of a non-conductive material can sometimes reduce or entirely block touch input. This is hit-or-miss, as most protectors are designed to allow touch.
- Temporary Clear Plastic Overlay: You could fashion a temporary overlay from a sheet of clear, stiff plastic (like from packaging) and secure it over your screen. This creates a physical barrier.
- Protective Case with Touch-Blocking Features: Some specialized cases might include a bezel or frame that slightly hovers over the screen, making it harder for accidental touches to register.
Limitations: These methods are often imperfect. They can affect display quality, reduce visibility, or only partially prevent touches. They also require purchasing or creating accessories. They're best considered a last resort or for very specific, short-term needs.
When Things Go Wrong: Troubleshooting Touchscreen Glitches
Sometimes, you might want to disable your touchscreen not out of choice, but out of necessity due to erratic behavior. Understanding common symptoms and basic troubleshooting can save you a headache.
Identifying Symptoms of a Malfunctioning Touchscreen
- Phantom Touches: Your screen acts as if it's being touched, even when no one is touching it. This can lead to random app launches, cursor movements, or typing.
- Delayed Response: You touch the screen, but there's a noticeable lag before the device reacts.
- Dead Zones: Specific areas of your screen are unresponsive to touch, while others work fine.
- Interference with Typing: Your typing is constantly interrupted by unintended touches registered by your palms or fingers.
Basic Diagnostic Steps
If you suspect your touchscreen is misbehaving:
- Clean Your Screen: A dirty screen can sometimes cause phantom touches or reduce responsiveness. Use a microfiber cloth and a screen cleaner (or just water) to thoroughly clean the display.
- Restart Your Chromebook: A simple reboot can often resolve temporary software glitches.
- Test in Different Apps/Conditions: Does the problem occur in all applications or just one? Does it happen when the Chromebook is charging or on battery? Look for patterns.
- Test Temporary Disabling: Using the
Search + Shift + TChrome Flags shortcut (Method 1) to temporarily turn off the touchscreen can help determine if the issue is with the touchscreen hardware/drivers or another part of Chrome OS. If disabling it stops the erratic behavior, the problem is almost certainly with the touchscreen itself.
Common Problems & Quick Fixes
- Phantom Touches: First, clean your screen. If that doesn't work, disable the touchscreen temporarily using Chrome Flags to see if the issue persists. If it does, it might be a hardware problem.
- Delayed Response: Ensure your Chrome OS is updated to the latest version. Try a restart. If issues continue, consider a Powerwash (backing up data first!) to rule out software corruption.
- Partial Screen Unresponsive: This often points to a hardware failure. If cleaning and restarting don't help, it's best to contact your Chromebook's manufacturer support for a hardware inspection.
Bringing it Back: Re-enabling Your Touchscreen
Just as you can quickly turn off your touchscreen, re-enabling it is straightforward. Here’s how, depending on the method you used to disable it.
Chrome Flags Method
If you disabled your touchscreen using the keyboard shortcut:
- Shortcut: Simply press
Search + Shift + Tagain. You'll see a notification confirming the touchscreen is now "enabled." - Flags Page: Alternatively, you can always go back to
chrome://flags/#ash-debug-shortcuts, change "Debugging keyboard shortcuts" back to "Default," and restart your Chromebook.
Settings Menu Method
If your Chromebook has a native toggle in its settings:
- Navigate to Settings: Go back to
Settings>Device(and the specific subsection where you found the toggle). - Toggle On: Locate the "Touchscreen" toggle and switch it back to the "on" position.
Terminal Command Method
If you used the xinput command in Developer Mode:
- Open Terminal: Press
Ctrl + Alt + Tand then typeshelland pressEnter. - Enable Command: Type
xinput enable [ID](using the ID number you noted earlier for your touchscreen device) and pressEnter. - Restart (if needed): Remember that
xinputchanges often reset after a restart. If you restart your Chromebook, you'll likely need to re-enter thexinput enablecommand if you want the touchscreen to function.
Smart Practices for Managing Your Chromebook Touchscreen
Taking a moment to understand a few best practices can help you choose the right approach and avoid potential headaches.
- Choosing the Right Method for You:
- For occasional, temporary toggling or quick troubleshooting, the
chrome://flagsshortcut (Search + Shift + T) is your best friend. It's fast and doesn't require permanent changes. - If your Chromebook offers a native toggle in Settings, use that. It's the most stable and officially supported method.
- Only venture into Terminal Commands and Developer Mode if you're an advanced user, understand the risks (especially the Powerwash), and absolutely need that level of control.
- Special Notes for Managed Devices (School/Work): Chromebooks provided by educational institutions or employers often have restrictions. Administrators can block access to
chrome://flagsor prevent Developer Mode. In these scenarios, your options might be limited to checking native settings or, if a hardware glitch, performing a "Hard Refresh" (Refresh + Power) to clear minor system issues. - Dispelling Battery Life Myths: While it's technically true that disabling touch sensors might save a minuscule amount of power, the actual impact on your Chromebook's overall battery life is usually negligible. Don't disable your touchscreen purely for battery extension.
- Hardware Safety Reassurance: Disabling your touchscreen via software methods (Chrome Flags or Settings) is completely safe and will not cause any physical damage to your device's hardware.
- External Keyboard Compatibility: If you're using an external, non-Chromebook specific keyboard, the
Searchkey for shortcuts likeSearch + Shift + Twill typically correspond to theWindows Keyon that keyboard. - The Importance of Updates: Always keep your Chrome OS updated to the latest version. Chrome Flags can change or be removed, and even native settings might shift with major updates. Regular updates also ensure you have the latest drivers and bug fixes for your hardware.
- Further Control: For more in-depth information on managing your Chromebook's input devices, you might want to explore how to completely disable Chromebook touchscreen functionality if your needs extend beyond temporary fixes.
Your Touchscreen, On Your Terms.
Navigating the digital world should be about efficiency and control, not fighting against accidental inputs. By understanding these quick and reliable methods to temporarily turn off your Chromebook's touchscreen, you empower yourself to tailor your device's behavior to your exact needs. Whether you're in a marathon typing session, diagnosing a phantom touch, or simply want a cleaner screen, you now have the tools to ensure your Chromebook responds precisely when, and only when, you want it to. Take control, stay focused, and enjoy a smoother computing experience.